Build Tool: Gradle
Abstract
In this document you learn to work with the current build tool of KeY: Gradle. You learn how to build, test, and deploy your current branch. Also, we cover the project import into IntelliJ and Eclipse.
Gradle Basic
Gradle is similar to Apache Ant, but instead of writing XML documents to describe your tasks Gradle uses a domain-specific language built upon Apache Groovy (and also Kotlin). Currently, we are using the Groovy DSL. Essentially: Writing gradle build scripts is writing Groovy. So if you need to do fancy stuff you should search how to do it in Groovy.
Upon Groovy, Gradle defines a notion of entities, e.g. Project, Task, Dependency, to model the structure of software modules or projects. Further information in the Gradle docs under Using tasks. The advantage of Gradle comes with its plugins. Until now, Gradle has no clue how to build a Java project.
Java Projects
The java plugin
teaches Gradle how to build Java projects. First, the plugin defines a two of
source sets: main and test (the following follows the default Gradle (Maven)
source set layout):
src/main/java-- Production Java source.src/main/resources-- Production resources, such as XML and properties files.src/test/java-- Test Java source.src/test/resources-- Test resources.
Second, the plugin defines a couple of task and interdepenecies:
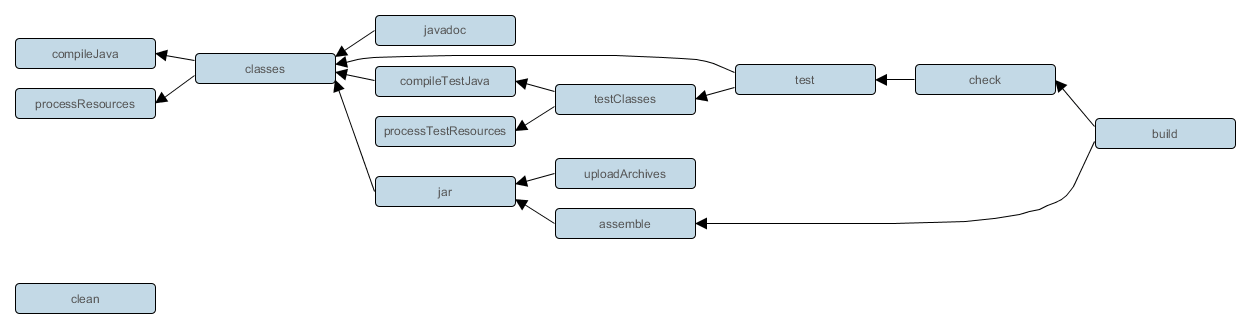
You should be aware of the task dependency if you write a custom task. Otherwise your task is executed in an incorrect order.
Every source set (main and test) has its own dependencies, e.g. jar files or
projects. Also, we distinguish between compile (implementation) and runtime.
Dependencies are declared within each project:
dependencies {
    # The production code dependent (compile- and run-time) on key.core
    implementation project(':key.core')

    # The src/test/java depends on junit, which is given
    # by an Maven identifier ('group:artefact:version')
    testImplementation 'org.junit:junit:4.12'

    # Use interactionlog if the production code is executed.
    # Do not use for compilation.
    runtimeOnly project(':keyext.interactionlog')
}
Detailed information for Building Java
Projects
are in the Gradle docs. The plugin application adds a task run to execute
the Java project and java-library
Multiple Projects
In KeY we have a multi-project
build.
This means, our root project key consists out of multiple sub-projects, e.g.
key.core, key.ui. In short, the sub-projects are discovered by reading the
settings.gradle. The include 'key.core' statement activates the folder
key.core as a sub-project. Note that no key.core/build.gradle is required.
Sub-projects are configured within the top level build.gradle. The declaration
subprojects { <body> } executes the <body> to configure each known
sub-project, cf. allprojects {...}. Specifcs of single projects are configures
by project(<name>) { <body> }. The body content is the same content you
would write in the <name>/build.gradle.
How to work with Gradle
With gradle tasks you can get a list of known tasks including a simple description.
There are some useful flags:
--parallel-- parallel building (number of worker equals cpu cores)--build-cache-- reuse of the build cache--info-- informationen on the task execution. Useful to examine why a task has to be run again.--scan-- sends statistics to gradle.org and creates an HTML report. Useful to examine the dependencies.
You can address tasks of sub-projects by prefixing the concerning task name with the sub-project.
Compile
For compiling the production sources just call:
$ gradle classes
The tests are compiled with:
$ gradle testClasses
If you only want a certain project, use its name:
$ gradle :key.core:testClasses #compiles key.core test classes and its dependencies
With the tasks :key:core:compileJavacc and :key.core:generateGrammarSource
you can run the grammar generation (javacc or antlr3) explicitly.
Test
Testing is as easy as compiling. With
$ gradle test
you run the JUnit tests. The correct test suites are configured in the
build.gradle. Additionally, :key:core offers two additional test tasks:
testProofRules and testRunAllProofs, which are successors of the Ant tasks.
Additionally to the test filter inside the build.gradle you can specify
filters on the command line. Useful for executing a particular failing test
case:
# Executes all tests in SomeTestClass
gradle test --tests SomeTestClass

# Executes a single specified test in SomeTestClass
gradle test --tests SomeTestClass.someSpecificMethod

gradle test --tests SomeTestClass.*someMethod*
Gradle aborts on the first failed test case. You can force it to keep running
with --continue flag.
You can let Gradle listen to code changes and let it run the test cases continuously1:
gradle test --continuous --tests "com.mypackage.foo.*"
Gradle generates HTML test reports in build/reports/test/ which also include
the sysout and stacktraces.
The check tasks execute test and also also execute (currently not
activated) static analyzers like PMD or Checkstyle.
For more information on testing see the gradle manual
Creating a new extension keyext.*
- Come up with a nice name
$name. - Register your project folder:
echo "include 'keyext.$name'" >> settings.gradle. - Create directories:
mkdir -p keyext.$name/src/{main,test}/{java,resources}. - Create a
build.gradleif necessary to add dependency or customize tool chain:touch keyext.$name/build.gradle - Declare
runtimeOnly project('keyext.$name')dependency in projectkey.ui. So your extension is deployed within the KeY deployment.
Working with IDEs
The import guides assume that you have already checked out a KeY branch with gradle as build tool.
Importing into IntelliJ IDEA
Currently, my recommendation.
- Open the project folder with IDEA.
- If you have switched the branches inside IDEA, you should close and reopen the project.
- A dialog for Gradle settings should come up.
- Configuration after your preferences.
- My configuration is:
- Use auto-import activated. (Deactivate when you are heavily working on the build scripts.)
- Create directories for empty content roots automatically
- Group modules: using qualify names
- Create separate modules per source sets
- An own local gradle distribution if you work with gradle on multiple projects. Otherwise stick Use default gradle wrapper (recommended).
- Click ok, and let IntelliJ bootstrap everything. Especially the first start takes some time: the gradle wrapper downloads and installs gradle. The plugin and project dependencies are fetched.
- A gradle tab should appear on the right border (near the Ant and Maven tab).
Troubleshoot
- The gradle settings dialog does not appear
IDEA finds a project configuration in the folder and loads it. You need to delete the IDEA project files:
rm -rf .idea key.iml */*.iml
A backup is recommended if you have special project-based configuration.
Importing into Eclipse
Since Eclipse Neon (22 June 2016) Eclipse is shipped with a plugin for Gradle: buildship. Nonetheless the support is far from ideal, but it should work. A tutorial with pictures (a little bit out-dated) is here
- Goto File -> Import… -> Gradle -> Gradle Project, then Next
- Select the folder of the KeY with the
build.gradlefile (key/key), then Next. - You can decide whether you make special settings for this project, or the workspace defaults should be taken. I have no recommendations and selected the default configuration.
- Eclipse shows a preview of what would be imported. In the current version,
you should see a tree with
keyas root andkey.core,key.util, etc as children. Click Finish. - Wait until the import has finished. During the compilation of Eclipse, you can open two views: Gradle Tasks and Gradle Executions under Windows -> Show View… -> Gradle.
- For making the classpath files finally suitable for the development in Eclipse,
call
gradle eclipse(if this doesn't work, try first callinggradle cleanEclipse) and you are good to go.
Troubleshooting
- Compile error: Cyclic dependencies
Eclipse does not distinguish between compile and runtime dependencies,
so there exists a cyclic dependency between key.ui and the extension packages.
Luckily, Eclipse is able to compile if you just re-declare this check as a warning.
Go to Window -> Preferences -> Java>Compiler>Building" and set *Circular Dependencies to Warning.
- Eclipse complains about the Java file in the resources folder
Eclipse does not distinguish between java sources and resources folder. It tries to compile everything that is in a resource folder.
This problem is solved by a modification of the exclude filter in .classpath.
For more information see gradle's eclipse plugin and the build.gradle
file.
Importing into Netbeans
Gradle Plugin is currently not available for Netbeans 9 or 10.
-
Long live TDD! ↩